참고자료
- https://firebase.flutter.dev/docs/messaging/overview/
- https://firebase.google.com/docs/cloud-messaging
- https://mookypoo.medium.com/flutter-fcm-푸쉬-알림-7e0699729462
- https://kanoos-stu.tistory.com/72
- https://eunjin3786.tistory.com/280
- https://arcanine33.github.io/flutter/Flutter-FCM/
- https://sudarlife.tistory.com/entry/Flutter-플러터-삽질은-그만-Firebase-Messaging-iOS-셋업
Flutter에서 Firebase Cloud Messaging(FCM) 구현
1. FCM 아키텍처 소개
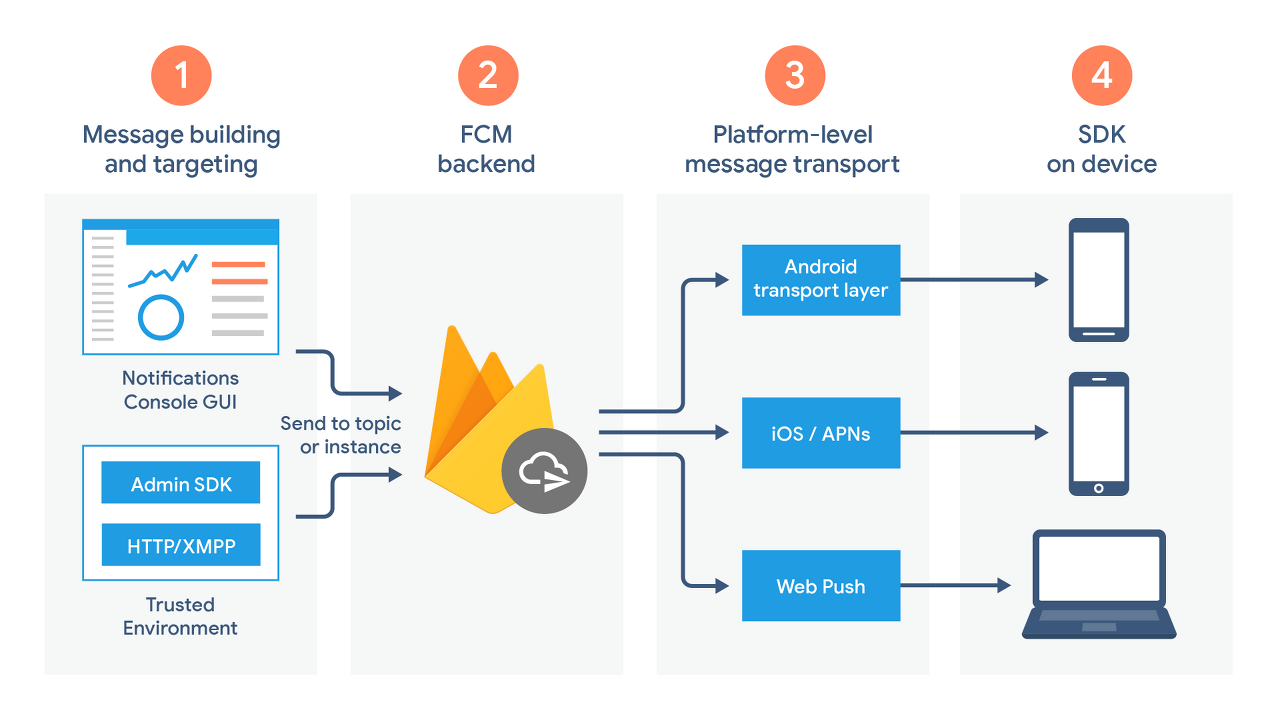
(1) Workflow
1. Tooling to compose or build message requests.
- The Notifications composer provides a GUI-based option for creating notification requests. For full automation and support for all message types, you must build message requests in a trusted server environment that supports the Firebase Admin SDK or the FCM server protocols. This environment could be Cloud Functions for Firebase, App Engine, or your own app server.
-> GUI 기반으로 알림 요청을 생성할 수 있습니다. 자동화 및 모든 메시지 타입 지원을 위해서는 Firebase Admin SDK 또는 FCM 서버 프로토콜을 지원하여 신뢰할 수 있는 서버 환경에서메시지 요청을 수행해야 합니다. 이러한 서버 환경에는 Firebase의 Cloud Functions, GCP의 App Engine 또는 자체 어플리케이션 서버가 가능합니다.
------
2. The FCM backend, which (among other functions) accepts message requests, performs fanout of messages via topics, and generates message metadata such as the message ID.
-> 메시지 요청을 받는 FCM 백엔드는 메시지 fanout 기능과 messageID와 같은 메타데이터 생성을 해줘야 합니다.
------
3. A platform-level transport layer, which routes the message to the targeted device, handles message delivery, and applies platform-specific configuration where appropriate. This transport layer includes:
- Android transport layer (ATL) for Android devices with Google Play services
- Apple Push Notification service (APNs) for Apple devices
- Web push protocol for web apps
* Note: Platform-level transport layers are outside the core FCM product. FCM messages routed to a platform-level transport layer may be subject to terms specific to that platform rather than FCM’s terms of service. Android message routing via ATL falls under the Google APIs terms of service.
-> 플랫폼 레벨의 전송 계층은 메시지 전달 및 플랫폼 특화된 구성을 적용해야 하는데, 이러한 전송 계층에는 Android 기기에 사용되는 Android Transport Layer(ATL), Apple 기기에 사용되는 Apple Push Notification service(APNs), 그리고 웹에서 쓰이는 Web push 프로토콜이 있습니다.
* 위 플랫폼 레벨 전송 계층은 FCM 프로덕트의 영역 밖이기 때문에 FCM 메시지는 FCM 서비스 정책이 아닌 플랫폼 자체에 종속적입니다. 특히, ATL을 통해 라우팅되는 Android 메시지는 Google APIs 이용약관을 따릅니다.
------
4. The FCM SDK on the user’s device, where the notification is displayed or the message is handled according to the app’s foreground/background state and any relevant application logic.
-> 플랫폼 레벨의 전송 계층은 메시지 전달 및 플랫폼 특화된 구성을 적용해야 하는데, 이러한 전송 계층에는 Android 기기에 사용되는 Android Transport Layer(ATL), Apple 기기에 사용되는 Apple Push Notification service(APNs), 그리고 웹에서 쓰이는 Web push 프로토콜이 있습니다.
(2) FCM Lifecycle
1. Register devices to receive messages from FCM.
- An instance of a client app registers to receive messages, obtaining a registration token that uniquely identifies the app instance.
-> FCM으로부터 메시지를 받기 위해서는 디바이스 등록이 필요합니다. Client app 인스턴스를 식별할 수 있는 고유한 token을 획득하여 등록합니다.
------
2. Send and receive downstream messages.
- Send a message. The app server sends messages to the client app:
The message is composed, either in the Notifications composer or a trusted environment, and a message request is sent to the FCM backend.The FCM backend receives the message request, generates a message ID and other metadata, and sends it to the platform specific transport layer.When the device is online, the message is sent via the platform-specific transport layer to the device.On the device, the client app receives the message or notification.
-> 애플리케이션 서버에서 클라이언트로 메시지를 보내는 과정은 다음과 같습니다. Notifications composer 또는 다른 신뢰할만한 서버 환경에서 FCM 백엔드로 보내진 메시지는 message ID와 메타데이터를 담은 message request가 전송 계층으로 보내집니다. (message 또는 notification 형태로)
2. Flutter에 FCM 환경 설정하기
(1) `firebase_core` 및 `firebase_messaging` 패키지 설치
flutter pub add firebase_core
flutter pub add firebase_messaging
(2-1) Android 환경 준비
- 만약 Flutter Android Embedding V2 (Flutter Version >= 1.12)을 사용 중이라면 아래 작업을 수행할 필요가 없습니다.
- FlutterFirebaseMessagingBackgroundService에 백그라운드에서 동작할 수 있도록 콜백함수가 필요합니다.
// ...
import io.flutter.plugins.firebase.messaging.FlutterFirebaseMessagingBackgroundService;

public class Application extends FlutterApplication implements PluginRegistrantCallback {
  // ...
  @Override
  public void onCreate() {
    super.onCreate();
    FlutterFirebaseMessagingBackgroundService.setPluginRegistrant(this);
  }

  @Override
  public void registerWith(PluginRegistry registry) {
    GeneratedPluginRegistrant.registerWith(registry);
  }
  // ...
}
(2-2) Mac & iOS 환경 준비
- swizzling 메소드를 비활성화하게 되면 Firebase Messaging 플러그인이 동작하지 않기 때문에 Info.plist 파일 내의 FirebaseAppDelegateProxyEnabled를 false 또는 No 값으로 설정해줍니다.
- 이후 https://firebase.flutter.dev/docs/messaging/apple-integration/ 문서를 읽으면서 그대로 따라해봅니다.
- https://eunjin3786.tistory.com/280 참고할 것!
- https://leemhyungyu.tistory.com/31 인증서는 여기 참고 (cer, p12 등)
(3) Flutter 재실행
flutter run
3. Firebase Cloud Messaging(FCM) 수신/제어
(1) Messaging 인스턴스 생성
- 프로젝트 파일 최상단(일반적으로는 lib/main.dart)에 firebase_messaging을 import 해줍니다.
- 이후, FirebaseMessaging 클래스의 인스턴스를 정의합니다.
import 'package:firebase_messaging/firebase_messaging.dart';

...

FirebaseMessaging messaging = FirebaseMessaging.instance;

...

void main() async {
    WidgetsFlutterBinding.ensureInitialized();
    await Firebase.initializeApp();
    ...
}
(2) Receiving messages (메시지 수신)
- iOS의 경우 실제 디바이스가 아닌 시뮬레이터에서는 테스트가 불가능합니다.
- 아래는 Device 상태를 세 가지로 나누어, Foreground / Background / Terminated된 상태에서 FCM 수신 시나리오를 설명하고 있습니다.
| Foreground | When the application is open, in view & in use. |
| Background | When the application is open, however in the background (minimised). This typically occurs when the user has pressed the "home" button on the device, has switched to another app via the app switcher or has the application open on a different tab (web). |
| Terminated | When the device is locked or the application is not running. The user can terminate an app by "swiping it away" via the app switcher UI on the device or closing a tab (web). |
- 세 가지 조건과 더불어, FCM을 통해 message payload를 수신하기 위해서는 아래의 조건들이 충족되어야 합니다.
1) The application must have opened at least once (to allow for registration with FCM).
2) On iOS, if the user swipes away the application from app Switcher, it must be manually reopened again for background messages to start working again.
3) On Android, if the user force quits the app from device settings, it must be manually reopened again for messages to start working.
4) On iOS & macOS, you must have correctly setup your project to integrate with FCM and APNs.
5) On web, you must have requested a token (via getToken) with the key of a "Web Push certificate".
- iOS, MacOS, Web에서는 FCM payload가 device에 전달되기 위해 유저 권한을 획득해야 합니다. `firebase_messaging` 패키지는 requestPermission 메소드로써 권한을 요청합니다.
FirebaseMessaging messaging = FirebaseMessaging.instance;

NotificationSettings settings = await messaging.requestPermission(
  alert: true,
  announcement: false,
  badge: true,
  carPlay: false,
  criticalAlert: false,
  provisional: false,
  sound: true,
);

print('User granted permission: ${settings.authorizationStatus}');
- NotificationSettings 클래스를 사용하여 device에서 유저가 허용하는 권한들에 대한 개별 boolean 값을 보관하는 인스턴스를 만들 수 있습니다. settings의 authorizationStatus에는 authorized / denied / notDetermined / provisional 네 가지 상태가 존재합니다.
(3) Handling messages (메시지 제어)
- (Web Token) Web에서는 public vapidKey를 messaging.getToken(vapidKey: 'KEY')에 전달하고, 프로젝트 root에 위치한 web/ 디렉토리에 firebase-messaging-sw.js를 넣어줍니다. (raw code는 여기서 확인할 수 있습니다.)
importScripts("https://www.gstatic.com/firebasejs/9.10.0/firebase-app-compat.js");
importScripts("https://www.gstatic.com/firebasejs/9.10.0/firebase-messaging-compat.js");

firebase.initializeApp({
  apiKey: 'AIzaSyB7wZb2tO1-Fs6GbDADUSTs2Qs3w08Hovw',
  appId: '1:406099696497:web:87e25e51afe982cd3574d0',
  messagingSenderId: '406099696497',
  projectId: 'flutterfire-e2e-tests',
  authDomain: 'flutterfire-e2e-tests.firebaseapp.com',
  databaseURL:
      'https://flutterfire-e2e-tests-default-rtdb.europe-west1.firebasedatabase.app',
  storageBucket: 'flutterfire-e2e-tests.appspot.com',
  measurementId: 'G-JN95N1JV2E',
});
// Necessary to receive background messages:
const messaging = firebase.messaging();

// Optional:
messaging.onBackgroundMessage((m) => {
  console.log("onBackgroundMessage", m);
});
이후, web/index.html 파일에 아래와 같이 serviceWorker로 등록되었는지 확인합니다.
  <!-- ...other html setup. -->
  <script>
    if ("serviceWorker" in navigator) {
      window.addEventListener("load", function () {
        navigator.serviceWorker.register("/firebase-messaging-sw.js");
      });
    }
  </script>
  <!-- ...put the script at the bottom of the enclosing body tags. -->
</body>
(4) Message types
1. Notification-only 메시지
페이로드에는 시각적으로 알림을 표출하는 notificationproperty가 담겨 있습니다. (present a visible notification to the user) notification key의 value로서 title 및 body의 key-value 쌍으로 이루어집니다.
2. Data-only 메시지
알림이 따로 없이 정적으로 메시지를 불러옵니다. (aka "silent message") Notification-only 메시지와 다르게 data key의 value로 사용자의 커스텀 key-value 쌍을 페이로드에 담을 수 있습니다.
3. Notification & Data 메시지
notification 및 data 두 가지 key에다 value를 지정할 수 있습니다.
아래는 notification 및 data key-value 쌍을 모두 가질 수 있는 3번 케이스의 json request입니다.
{
   "message":{
      "token":"token_1",
      "data":{},
      "notification":{
        "title":"FCM Message",
        "body":"This is an FCM notification message!",
      }
   }
}
(5) Foreground Messages
-
/// Dart

Future<void> _firebaseMessagingForegroundHandler() async {
    // Online 상태에서 알람을 눌렀을 때
    FirebaseMessaging.onMessage.listen((RemoteMessage message) {
    });

    // Resume 상태에서 알람을 눌렀을 때
    FirebaseMessaging.onMessageOpenedApp.listen((RemoteMessage message) {
        _initMessage();
    });
}
(6) Background Messages
-
/// Dart

Future<void> _firebaseMessagingBackgroundHandler(RemoteMessage message) async {
    await Firebase.initializeApp();
    _initMessage(); //백그라운드에서 알람을 눌렀을 때
}

Future<void> _initMessage() async {
    _firebaseMessaging.getInitialMessage().then((RemoteMessage? message) {
        if (message != null) {
            if (message.data['a'] != null) {
		         //a 가 key 값인 value를 비교
			    Get.toNamed("${message.data['a']}");
            }
        }
    });
}
(7) FCM 알림 허용/거부 제어
-
/// Dart

_firebaseMessaging.subscribeToTopic('something'); // 구독
_firebaseMessaging.unsubscribeFromTopic('something'); // 비구독


댓글